Setting up Windows Terminal in Windows 10 can significantly enhance your command-line experience. This guide will walk you through the entire process, ensuring you have a smooth and efficient setup. Let’s dive in! 🚀
Why Use Windows Terminal?
Windows Terminal is a modern, fast, and customizable terminal application for Windows. It supports multiple tabs, Unicode and UTF-8 character support, and a rich set of customization options. Whether you’re a developer, system administrator, or just a power user, Windows Terminal can make your command-line tasks more enjoyable and productive.
Prerequisites
Before we begin, ensure you have the following:
- Windows 10: The latest updates installed.
- Microsoft Store: Access to download applications.
Step 1: Downloading the Necessary Software
From the Microsoft Store, install the following applications:
- Windows Terminal
- Powershell Core
- Winget-cli (Windows Package Manager)
Installation Steps
- Open Microsoft Store: Search for each application and click “Get” to install.
- Verify Installation: After installation, verify that each application is installed correctly by searching for them in the Start menu.
Step 2: Set Default Console Host as Windows Terminal in Windows 10
Update Your System
If you are on an earlier version of Windows 10, install the KB5026435 update. This update enables you to set Windows Terminal as the default terminal application.
Set Windows Terminal as Default
-
Access Developer Settings:
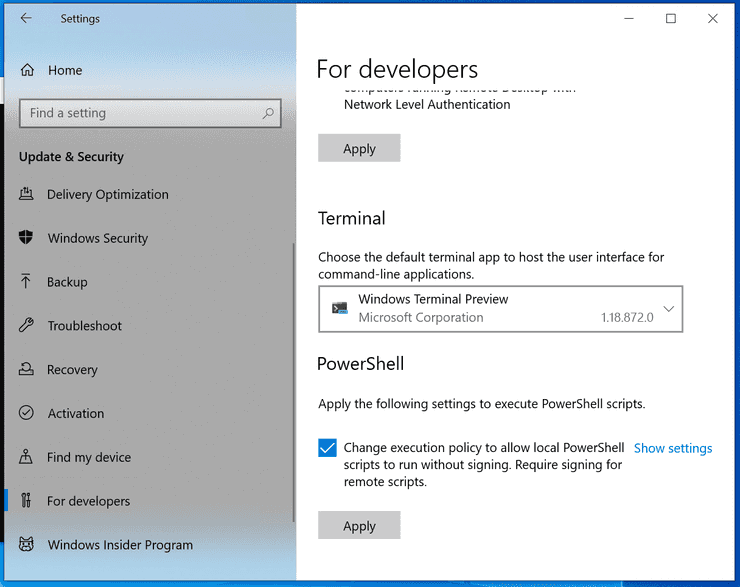
- Go to Settings > Update & Security > For Developers.
- Under the Terminal section, set the default terminal application to Windows Terminal.
-
Configure Powershell Core:
- Navigate to
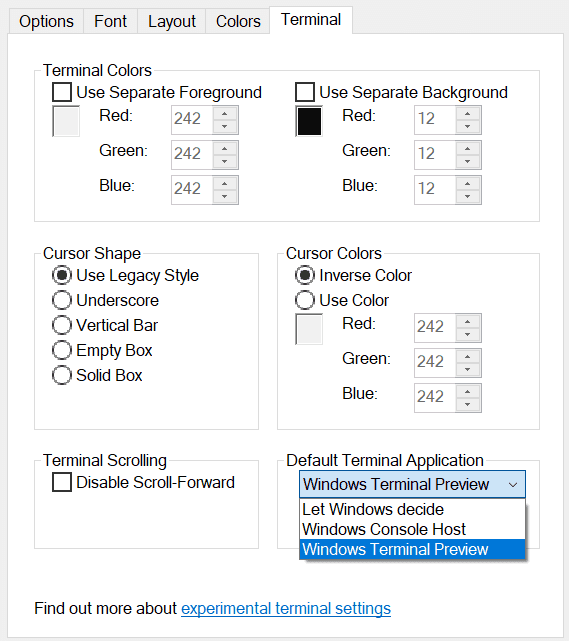
C:\ProgramData\Microsoft\Windows\Start Menu\Programs\PowerShell. - Right-click on the Powershell shortcut and select Properties.
- Go to the Terminal tab and set “Default Terminal Application” to Windows Terminal.
- Navigate to
-
Access Terminal Settings:
- After installing Windows Terminal v1.17, you can access settings by pressing
Ctrl+,. - Set Windows Terminal as the “default terminal application”.
- After installing Windows Terminal v1.17, you can access settings by pressing
Step 3: Add Windows Terminal To Win+X Menu
Script to Add Windows Terminal to Win+X Menu
-
Create a Script:
- Create a file named
addTerminalToWinX.ps1and copy the following code. The source of the script can be found here.
$folderPath = "$ENV:LOCALAPPDATA\Microsoft\Windows\WinX\Group3" $adminFilePath = Join-Path $folderPath "00 - Windows Terminal.lnk" $normalFilePath = Join-Path $folderPath "00a - Windows Terminal.lnk" $adminDisplay = "Windows Terminal (&Admin)" $normalDisplay = "Windows &Terminal" $shortcutFile = Join-Path $ENV:TEMP "Windows Terminal Shortcut.lnk" Invoke-WebRequest -OutFile $shortcutFile -Uri "https://gist.github.com/fredrikhr/0994a6e81443c439659db1d9763365d7/raw/Windows%2520Terminal%2520Shortcut.lnk" Copy-Item $shortcutFile $adminFilePath -Force -Verbose Copy-Item $shortcutFile $normalFilePath -Force -Verbose Remove-Item -Verbose -Force $shortcutFile # Get the Windows Shell COM service instance: $shell = New-Object -COM WScript.Shell # Change the Admin Shortcut display name (Description) and mark as Run as Administrator $adminShortcut = $shell.CreateShortcut($adminFilePath) $adminShortcut.Description = $adminDisplay # Set Display in Win+X menu using A as the mnemonic character $adminShortcut.Save() # Setting the Run as administrator flag does not have an API, flip the bit manually # ref.: https://stackoverflow.com/a/29002207/2226662 $adminBytes = [System.IO.File]::ReadAllBytes($adminFilePath) $adminBytes[0x15] = $adminBytes[0x15] -bor 0x20 #set byte 21 (0x15) bit 6 (0x20) ON [System.IO.File]::WriteAllBytes($adminFilePath, $adminBytes) # Change the Normal Shortcut display name (Description) $normalShortcut = $shell.CreateShortcut($normalFilePath) $normalShortcut.Description = $normalDisplay # Set Display in Win+X menu using T as the mnemonic character $normalShortcut.Save() - Create a file named
-
Run the Script:
- Open Powershell as Administrator and run the script:
.\addTerminalToWinX.ps1 -
Restart Explorer:
- After the script runs, restart the
explorer.exeshell from Task Manager.
- After the script runs, restart the
-
If you wish to use custom shortcuts then the shortcut files in the WinX folder have to be hashed correctly to be accepted by Windows. There is a tool hashlnk that can be used to hash shortcut links. Here is an example to hash the ink file:
> hashlnk.exe "Windows Terminal Shortcut.lnk" HashLnk v0.2.0.0 Copyright(c) 2012 Rafael Rivera Within Windows - http://withinwindows.com Hash generated and applied (0x4B665D57) -
To apply the Windows Terminal shortcut for all new users on a Windows machine, you can modify the
AppData\Localfolder of theDefaultuser instead. Therefore, change the following in the first line in the code snippet above to:$folderPath = "C:\Users\Default\AppData\Local\Microsoft\Windows\WinX\Group3" -
For more customization of the Win+X Folder see Customizing the WinX menu, and making it user-specific.
- The entries that control the WinX menu are found in the folder at
%LOCALAPPDATA%\Microsoft\Windows\WinX, and are subdivided into folders with names ofGroupX. - The Windows Terminal is ADDED in Group3
%LOCALAPPDATA%\Microsoft\Windows\WinX\Group3.
- The entries that control the WinX menu are found in the folder at
Verify the Win+X Menu
After restarting, the Windows Terminal shortcuts should appear in the Win+X context menu.
Step 4: Setting Up Windows Terminal
Add a New Profile
To add a new profile in Windows Terminal, you need a GUID for your custom profile. Generate one using PowerShell:
[guid]::NewGuid()Customize Windows Terminal
-
Open Settings: Press
Ctrl+,to open the settings. -
Add Custom Actions:
"actions": [
  {
    "command": { // To Summon Windows Terminal From any window if active
      "action": "globalSummon"
    },
    "keys": "alt+t"
  },
  { "command": "tabSearch", "keys": "ctrl+t" } // To Search TAB
]
Launch From Explorer
In the address bar of File Explorer, type:
wt -d .This command launches Windows Terminal in the current directory.
Conclusion
Congratulations! You’ve successfully set up Windows Terminal in Windows 10. This setup will enhance your command-line experience, making it more efficient and enjoyable. Happy coding! 🎉
I’m looking for opportunities as a web developer, so feel free to contact me at ankitsam0602@gmail.com. Let’s connect and create something amazing together! 🌟
If you found this guide helpful, don’t forget to share it with your fellow developers!


