Setting up a robust coding environment for C++, Java, and Python in Windows can be a bit daunting, but with the right steps, it becomes a breeze. This guide will walk you through the entire process, ensuring you have a seamless setup. Let’s dive in! 🚀
Why Set Up a Coding Environment?
A well-configured coding environment can significantly enhance your productivity. Whether you’re a beginner or an experienced developer, having the right tools and configurations can make your coding experience more enjoyable and efficient.
Prerequisites
Before we begin, ensure you have the following:
- Windows OS: The latest updates installed.
- 7-Zip: A decompressor to unzip
.7zarchives. Download it from here. - VS Code: A versatile code editor. Download it from here.
Step 1: Setting Up C++
Downloading WinLibs
WinLibs is a standalone build of GCC and MinGW-w64 for Windows. It includes various tools like GDB, GNU Binutils, GNU Make, and more.
WinLibs Build Details
WinLibs offers several builds tailored to different needs:
- POSIX Threading Model: Best for cross-platform compatibility.
- WIN32 Threading Model: Native Windows threading but lacks POSIX threads.
- MCF Threading Model: Introduced in GCC 13, offers better performance and features.
Runtime Library Options
- MSVCRT: Traditional runtime library, available on all Windows versions.
- UCRT: Universal C Runtime, available on Windows 10 and later, provides better standards conformance.
Download Syntax
Download the package with the following naming convention:
GCC xx.x.0 (with POSIX threads) + LLVM/Clang/LLD/LLDB xx.x.x + MinGW-w64 xx.x.x UCRT - release x - Win64For example:
GCC 11.2.0 (with POSIX threads) + LLVM/Clang/LLD/LLDB 12.0.1 + MinGW-w64 9.0.0 UCRT - release 2 - Win64- Download: Visit WinLibs and download the Win64 - x86_64 (UCRT) version.
- Extract: Use 7-Zip to extract the downloaded file to
C:/codetools/mingw64/. - Add to PATH: Add
C:/codetools/mingw64/binto your Windows environment path.
Configuring Environment Variables
- Open Control Panel: Go to System > Advanced system settings > Environment Variables.
- Edit PATH: Add
C:/codetools/mingw64/binto the Path variable.
Verify Installation
Restart Command Prompt and then open and type:
g++ --versionYou should see the installed GCC version.
Step 2: Setting Up Python
Downloading Miniforge
Miniforge is a minimal installer for conda, specifically for conda-forge.
- Download: Visit Miniforge and download
Miniforge3-Windows-x86_64.exe. Here the steps are shown in Mambaforge but Miniforge also have the same steps. - Install: Run the installer and follow these steps:
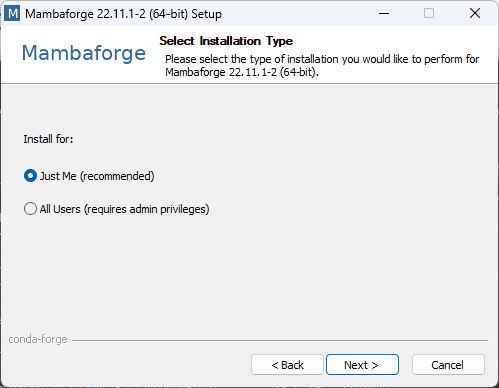
- Step 1: Install for “just me”.
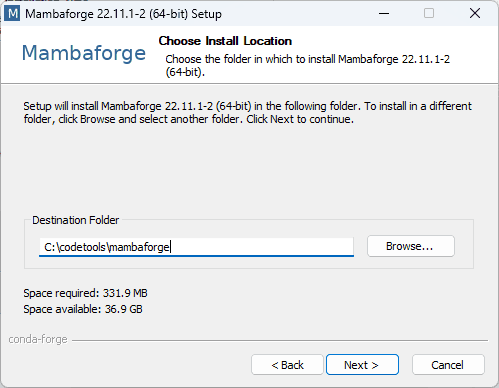
- Step 2: Set the installation path to
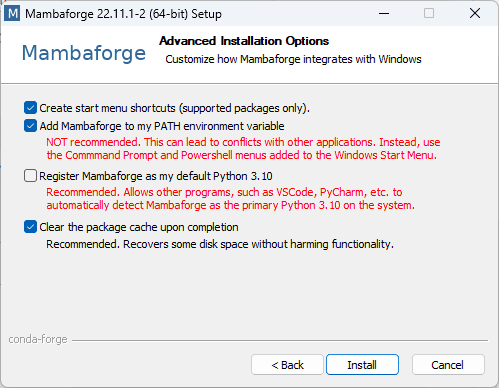
C:\codetools\mambaforge. - Step 3: Check “Add Mambaforge to my PATH environment variable”.
- Step 4: Deselect “register XXX as my default python 3.XX”.
- Step 5: Wait for the installation to complete.
Post-Install Configuration
Open the Miniforge CMD terminal and run:
conda config --set auto_activate_base false
conda config --set channel_priority strict
conda init --all
conda update --yes --all
conda install --yes --name base mamba
Verify Installation
Open Command Prompt and type:
python --versionYou should see the installed Python version.
Installation Images
Step 1: Install for “just me”.
Step 2: Set the path to install C:\codetools\mambaforge.
Step 3: Check “Add Mambaforge to my PATH environment variable”. Deselect “register XXX as my default python 3.XX”.
Note: The images are from the Mambaforge installer, but the steps are the same for Miniforge.
Step 3: Setting Up Java
Downloading OpenJDK
- Download: Visit OpenJDK and download the latest version. The latest version should be JDK XX, where XX is the version number.
- Extract: Use 7-Zip to extract the downloaded file to
C:/codetools/jdk-xx/.
Configuring Environment Variables
- Open Control Panel: Go to System > Advanced system settings > Environment Variables.
- Set JAVA_HOME:
- Click New under System Variables.
- Enter
JAVA_HOMEas the variable name. - Enter
C:/codetools/jdk-xxas the variable value.
- Edit PATH: Add
%JAVA_HOME%\binto the Path variable.
Verify Installation
Open Command Prompt and type:
java -versionYou should see the installed JDK version.
Step 4: Configuring VS Code for Code Execution
Installing Code Runner
- Install Extension: Open VS Code, go to the Extensions view, and search for “Code Runner”. Install it.
- Configure Settings:
- Open
settings.jsonby pressingCtrl+Shift+Pand searching for “settings json”. - Add the following configurations:
- Open
{
  "code-runner.executorMap": {
    "java": "cd $dir ; clear && javac $fileName && java $fileNameWithoutExt && Remove-Item $fileNameWithoutExt.class ",
    "cpp": "cd $dir ; clear && g++ $fileName -o $fileNameWithoutExt.exe && .\\$fileNameWithoutExt.exe && Remove-Item $fileNameWithoutExt.exe"
  }
}
Verify Configuration
Create a simple Java or C++ file and run it using the Code Runner extension.
Conclusion
Congratulations! You’ve successfully set up C++, Java, and Python in Windows. This setup will enhance your coding experience, making it more efficient and enjoyable. Happy coding! 🎉
I’m looking for opportunities as a web developer, so feel free to contact me at ankitsam0602@gmail.com. Let’s connect and create something amazing together!🌟
If you found this guide helpful, don’t forget to share it with your fellow developers!


